Wednesday, June 26, 2013

All about clay, part 5

By Renny Doyle
JUNE 26, 2013
 
Body clay remains a fantastic tool for removing over-spray but other important uses have been developed.
Deposits on paint surfaces of any type continue to be a challenge to many detail technicians and clay can come to the rescue and assist at achieving higher quality work.
 
Not only are technicians using clay on paint, many parts of a vehicle can be enhanced with the use of clay including:
 
1. Wheels: When clay has served its life by restoring paint surfaces and is nearly ready to be tossed, it can then be put to work on wheels and wheel-well trim.
 
Clay works great at removing stubborn wheel stains and deposits. The painted areas within the wheel-well trim are another area that nearly discarded clay can improve.
 
2. Windows: While several methods exist for cleaning windows, clay can also be an effective source for removing bugs, road film and other contaminates from windshields and side windows.
 
3. Chrome bumpers: When bug and road grime build up on chrome bumpers and trim, clay can be an effective avenue to try.
 
4. Front grills: For example, a newly purchased truck was delivered, and it was quickly noticed that the chrome grill had a tremendous amount of hard water deposits.
Using clay within the recesses of the grill, all hard water spots were safely removed without affecting the grill finish.
 
5. Pre-polishing prep: Before polishing paint, some detailers prefer to clay. This preps the paint, making certain the surface is smooth and clean of paint deposits.


Tuesday, June 25, 2013

Top Ten Car Wash Soaps

Top Ten Car Wash Soaps Based On Popularity and Customer Satisfaction:

1. Griot’s Garage Car Wash


2. Adam’s Car Shampoo

3. Meguiar’s Gold Class Car Wash

Read the Car Care Fanatic review HERE

4. Mother’s California Gold Car Wash

5. Zymol Auto Bath

6. Duragloss 902 Car Wash Concentrate

7. Chemical Guys Maxi Suds II

8. Sonax Gloss Shampoo Concentrate

9. Mother’s California Gold Wash & Wax

10. Turtle Wax Ice Car Wash


All about clay, part 4

By Renny Doyle

With your flattened clay in hand, start on the high points of the vehicle. Apply a generous amount of lubricant to the surface.
 
Begin on the high points of the vehicle and with strokes in the direction of airflow. Make the strokes from front to back and break the area into reachable sections that are small enough to clay without the lubricating agent drying.
 
Follow these claying strokes by drying the area and rubbing your hand across the surface to inspect for smoothness.
Inspect the area with the magnifying glass and compare to the areas not yet clayed. This action allows you to visually see the change.
 
If surface debris remains, you may want to re-clay and this time start in the opposite direction of airflow or from front to back and then side-to-side. This change in direction will sometimes dislodge surface material that was not coming off with single direction strokes.
 
Tip: As you use the clay bar, make certain you turn the clay. This is done by rolling the clay back out and kneading the clay, which will cause the clean internal clay to move to the outer areas and thus reduce the chances of micro surface scratches.
 
You should perform this step several times while claying a vehicle.
 
Repeat the above steps on the entire vehicle, finalizing the top sections first. Leave the lower 12 ? of the vehicle for last, as these areas are usually the most contaminated and can cause a quick death for clay bars.
 
When you have completed the claying process you may need to re-wash the vehicle or at least use a liquid detailer to wipe the finish down so that the finish is ready for the next step within the detail process.


(from: http://www.carwash.com/articles/87701-all-about-clay-part-4)

Friday, June 21, 2013

All about clay, part 3

June 12, 2013
 
Watch the area that's being worked on with clay. Watch for the visual changes being made.
 
Feel the clay glide across the finish. Utilize your senses within your hand to feel for the clay sticking, this may mean you need more lubricant. Also feel for the clay grabbing onto imperfections.
 
Listen to the sounds made as you clay. Listen for scratching sounds or if the sounds change.
 
This could save you both time and money from having to remove surface scratches from the finish. Using your senses should be an active part of claying.


Thursday, June 20, 2013

Clean Air Equals Healthy Heart

Posted by detailxperts on February 22nd, 2011

Eating, smoking, coughing and sneezing are just a few things we do in our vehicles. In other words you are simply spreading germs in your vehicle’s cabin. We spend a tremendous amount of time in our cars and not many people actually calculate how much time is spent there. One hour here, two hours there and it’s a safe bet to say you spend more time in your car than in your own dining room.

It is essential to have your vehicle sanitized and sterilized.

All things that you allow to go on in your car you have complete control over. You should never allow someone to smoke inside your car. If you care at all about your health and heart, you would not contribute to help someone kill you. Smoking is not good for your heart, especially in a closed area. The next time a cigarette is sparked in your car, keep in mind a smoker exposes you to secondhand smoke levels as high or higher as those in a smoke-filled bar. And you can see what we can no longer do in bars. Protect yourself and your loved ones by making your vehicle smoke-free. Not only does smoking affect your health, it affects the interior of your vehicle making the interiors cloth darken and creating bacteria.
 
Many bacterias are lurking within your vehicle. Bacterias range from Staphylococcus to Bacillus Cereus but of course there are many more. Yeah, they are technical terms and may even sound foreign, but they contain elements your stomach will find extremely unfamiliar. These germs cause nausea, food poisoning and even vomiting. The germs enter your vehicle when you bring in dirt and soil from outside. The situation gets worse when you leave food in your car; dropping a fry and not picking it up to splattering a little coffee on the console. It is important to clean the interior of your vehicle just as you would your dining area, kitchen even bathroom!

When was the last time you gave your car a thorough interior cleaning?

Spring is in the air which means more time will be spent in your car. If eating and smoking is a must for you, it is extremely important to have your vehicle sterilized and sanitized. Having a professional sterilize and sanitize helps to kill the germs that linger around, especially if you have children present. Children are constantly touching and coughing on things while spreading germs. Sterilizing the interior of your vehicle gives your upholstery and seats the deep cleaning that it deserves. The next time you think about opening a bag of chips or pulling up to the drive through window you will think twice. Important facet to remember is GERMS are everywhere around us. They are non avoidable but there are cautious steps you can take to limit them. Clean air and a sterilized surface in your vehicle’s cabin will lead to a healthy heart.

All about clay, part 2

JUNE 05, 2013

The process for correctly claying a vehicle is a very simple series of actions.
First, make sure to give the vehicle a thorough wash and clean all soil and dirt from its surfaces. Dry the vehicle and inspect the finish for any imperfections you can work on.
Before applying to the surface, remove the clay from the packaging. Preferably, break the clay in half and roll one half of the clay into a ball.
Next flatten the ball into a pancake — this will allow easier movement on the surface and better the quality.
Before starting, check the paint surface for dust and or debris. Even a slight breeze can deposit dust on the surface that, in turn, will cause scratching.

(from: http://www.carwash.com/articles/87621-all-about-clay-part-2)

Wednesday, June 19, 2013

All about clay, part 1

May 29, 2013
 
For those that have seen clay in action, the origins of body clay are sometimes as mystical as how it works.
Some say it came from Asia for the removal of airborne particles from paint surfaces, while others swear it came from creative painters in the US for the removal of over-spray.
 
Clay works by literally grabbing the object and removing it from the paint surface.
 
Even today, after countless clay jobs, detailers are still sometimes amazed at its simplicity. No matter its origins, body clay is something that every detailer should be familiar with.
 
Before you begin

Before you get started on claying, make sure you have a few items handy:
 
1. The clay bar of choice: Depending on the manufacturer, you may choose from light, moderate or highly aggressive clays.
2. A lubricating agent: While some will suggest water, studies show that this increases the chance of micro surface scratches developing.
A good suggestion is to use either soapy water or a liquid spray detailer product.
3. Several drying cloths: Micro fibers or shammy's are a common recommendation.
4. A lighted magnifying glass: This will allow you to inspect the paint finish both before and after claying and is also a great sales tool when shared with customers.


Car Detailing Tips: 9 Essential Steps to Car Detailing

February 21, 2012

A checklist of auto detailing tips covering the interior and exterior. Upgrade the look of your vehicle with the following car detailing tips.

A few car detailing tips can help you maintain a good looking car. Getting a professional to detail a car can be pricey. Doing it yourself can be a money saver. In addition, it can be very gratifying once you step away from the car to take in all of your hard work.
There a number of essential steps to car detailing, so let's explore them in order to get you prepared to do a thorough job.
Interior
Car detailing takes place inside the car as well as on the outside. It is best to start with the inside and finish with a clean wash and wax of the outside. Getting that interior clean can cause some dust to kick up. There are five steps to a great interior detail job.
  • Vacuuming.Start with the floor mats, carpeting and upholstery. A good vacuum is always needed after some neglect because of the number of things that can be tracked into a car. Dirt collects and gets everywhere. Vacuum under the seats, dash and rear window area. Leave nothing untouched by the vacuum
  • Repairs and further cleaning.The rugs may have stains or possibly burns from dropped cigarettes. So some extra work to the rugs and seating may be required. Foamy cleaners are good for stains, but be careful not to cause any mildewy smells. A rug burn may need to be cut out and replaced with a piece from a spot not seen by the eye. To get that new piece to stick, make sure to use a strong and water-resistant adhesive
  • Hard surfaces.If you have leather seats or a vinyl dash, then cleaning is something you always need to do to get the most out the car's look. Always remember that vinyl and leather are different, so they require different cleaners and conditioners
  • Dashboard. The various buttons, like the radio, present a great place for dust to collect. This area also presents one of the biggest challenges. There are two ways to get at those detailed areas that make up the dash and they arecotton swabs and a small can of compressed air. Both of these have their advantages, so find the best thing for your car
  • Interior glass and plastic gauge lenses. It is important to stay on top of cleaning these areas because they affect the overall look and the view from the inside. As the car ages, the glass can develop a look that is not exactly clear, so a good glass cleaner will be your top priority. Watch the streaking
Exterior
The first thing you notice is the outside of your car as you walk up to it. Weather and other elements play havoc on a car's exterior, so let's look at the four steps to a great outside detail.
  • A good wash.Start with an overall wash of the car. Dirt will collect even more in certain places, such as the lower part of the car near the tires. Use a dependable car cleaning soap, a water hose with a good flow and finish it off by drying with a terry cloth or piece of chamois leather
  • Wheels.Give the wheels, including the wells, hub caps and tire, a good scrub and polish. This will require getting down there and giving this area a thorough clean. Use only approved brushes, cleaners and polish for this area
  • Dents, scratches and nicks.After the car is dry, give it a look over in order to find any noticeable damage. Certain scratches may be easily cleaned and repaired. If there is something that needs more attention, then a professional may be needed
  • The final polish. A good waxing or polishing is needed to give the car that shiny, clean look. Even the plastic chrome needs a good waxing. A great waxing can protect the car's paint and give it long-lasting potential. Be aware of what goes on what when doing this step. The tires need a different polish than the hood

Monday, June 17, 2013

Interior Cleaning and Conditioning How To's

Other people may admire the outside your vehicle, but you see the inside every time you drive. Depending on how you use your vehicle, the interior may need even more TLC than the paint! This guide will take you through the basics of interior care. After all, it’s what’s on the inside that counts!
The interior of your car is a relatively small space. Small messes have a huge impact! Keep your interior looking great with weekly quick-cleanings. A little time spent cleaning each weekend will keep your monthly super clean-up from taking up your whole Saturday!


Weekly Cleaning Regimen

  1. Use a Cobra Supreme 530 Microfiber Towel to wipe down all solid surfaces. This microfiber cloth will catch the accumulated dust and minor spills that have occurred since the last detailing.

  2. Remove pet hair in seconds with the Rubber Pet Brush. It takes just a minute or two to brush pet hair off the seats.

  3. Floor mats probably bear the brunt of abuse during the week. Shake them out if they’re not too bad. If you have a Metro VAC N GO 500 High Performance Hand Vac at your disposal, go ahead a give them a quick vacuuming. This little machine isn’t cumbersome to use and it has great suction for a hand vac.
Unless you made a big mess that week, this is all you need to do on a weekly basis.
Featured Products:Rubber Pet Brush
Metro VAC N GO 500 High Performance Hand Vac


Monthly Cleaning Regimen

Give your interior a thorough cleaning about once a month. If you get into a habit, no spot or stain will go unnoticed.
  1. If you own the Metro Vac ‘N Blo you’ll find the clean-up a breeze. The Vac N Blo's crevice attachments make it easy to get into all those tight spots where only dirt and pocket change go.

  2. Break out your Wolfgang Spot Eliminator and make carpet and upholstery stains vanish. Use our recommended Mat and Carpet Scrub Brush to work the cleaner into the spot and blot it away with a clean towel. Once the spot is dry, you can re-vacuum the treated area to fluff the carpet pile again.

  3. Wipe down all vinyl, plastic and rubber surfaces with a damp Cobra Microfiber Detailing Cloth. You can use either plain water or a cleaner, like Detailer's Pro Series Total Interior Cleaner. Many rubber and vinyl protectants have some cleaning ability so, unless you have major dressing build-up or stains, you can go straight to the Detailer's Pro Series Interior Surface Protectant. 

    Warning!
     Avoid silicone-based protectants.
     Silicone leaves an oily residue and it attracts dust. Over time, it can turn your dashboard yellow. Stick to water-based protectants and you’ll never have to worry about a greasy, yellow interior.

  4. Next clean the interior glass using a non-ammonia glass cleaner, like Detailer's Pro Series Krystal Vision Glass Cleaner or Stoner Invisible Glass Pump Spray. Both of these cleaners are safe on tinted windows. Use the Cobra Waffle Weave Microfiber Glass Towel to wipe the glass clean with no streaks or lint. To avoid overspray, mist the towel with the glass cleaner, rather than spraying it directly on the glass.

  5. You will need the Mini Two-Way Detailing Brush to get inside the vents and in the seams where otherwise only dust, lint and the stray coins will travel. These areas are often overlooked and difficult to clean, but it makes a big difference in the overall appearance of your vehicle’s interior.

  6. Vinyl seats will respond best to Pinnacle Leather and Vinyl Cleaner for spills and dust. It also works superbly on leather. UV exposure has disastrous effects on both leather and vinyl so we have found the best product on the market today in UV protection is “ozone safe” 303 Aerospace Protectant. Coat your vinyl seats with 303 for lasting protection. The finish is clean, clear, and non-greasy.
That’s the lowdown on interior care. If you need more information on the care and conditioning of leather seats, please visit our guide entitled, “Proper Leather Care”.
Featured Products:Metro Vac ‘N Blo
Wolfgang Spot Eliminator
Mat and Carpet Scrub Brush

DP Interior Surface Protectant is a multi-surface shield for your vehicle’s interior. In addition to protectants, DP Interior Surface Protectant contains a mild cleaner to remove surface dust and dirt.DP Total Interior Cleaner cleans plastic, vinyl, leather, carpet, and upholstery without harsh solvents or caustic chemicals.
Detailer's Pro Series Krystal Vision Glass Cleaner

Stoner Invisible Glass Pump Spray
Cobra Waffle Weave Microfiber Glass Towel
Mini Two-Way Detailing Brush
Pinnacle Leather and Vinyl Cleaner
303 Aerospace Protectant
Odor Elimination

You can’t see them. You can’t escape them. Interior car odors are everywhere! It can feel like you’re trapped in a fish bowl of bad smells when you have an odor problem in your vehicle. Fortunately, there are some excellent products on the market to quickly and permanently eliminate odors.

Detailer's Pro Series Dual Action Odor Eliminators work as foggers or as quick-burst air fresheners. They eradicate odors in the air, on fabric, and on carpet. They are available in several scents to suit your taste.Dakota Non-Smoke is an odor-eliminating spray that is particularly effective at removing the smell of cigarette smoke. Besides being highly effective in automobiles, Dakota products work well in the home, in RVs, and in hotel rooms.

Another excellent option is the Clean Air Genie Fogger. This one-time-use deodorizer permeates fabrics, air vents, and the air to destroy odors. It produces a temporary clean scent that gradually fades, but the foul smell never returns.
(from: http://www.autogeek.net/interior.html)

How to Clean Leather Seats

Leather Care

If leather is to retain its beauty, it must be cared for, cleaned and conditioned. It’s much easier to spend a little time protecting and conditioning your fine leather upholstery than spending the energy and money to salvage it. Keeping your leather in good condition begins with a regular wipe down with your favorite one-step cleaner. Our daily “one-step” starts with Pinnacle Leather Cleaner/Conditioner on a Cobra Microfiber Towel.

Have seen leather that has been ignored and mistreated? What remains is dried, prematurely aged, and cracked leather. Without proper care and conditioning your leather will age rapidly, losing its luster and flexibility. This process is rapidly accelerated in warmer climates. Regular cleaning and conditioning is all it takes to keep leather looking fresh, supple, and soft.


What Is Proper Leather Care?

Leather surfaces are just like beautiful, delicate skin. Leather must be carefully cleansed before it can be properly conditioned. As leather ages, it loses essential protectants infused into the leather during the manufacturing process. That leaves the leather susceptible to dirt, oils, and UV damage. To keep leather looking and feeling its best, you must first clean it and then replace the lost moisture and protection.


The Two-Step Solution!

Pinnacle Leather and Vinyl Cleaner, a pure cleaner, free of petroleum solvents, silicone oils or gloss agents, penetrates deep into every pore. It should be applied with a Cobra Microfiber Applicator Pad, or a Leather and Vinyl Scrub Brush. Agitation, not scrubbing, is the key. This agitation opens pores and allows dirt and body oils to rise to the surface of the leather where it can be wiped away.

After a thorough cleansing, your leather is ready for step two: application of a quality conditioner, like market leaders, Wolfgang Leather Care Conditioner or Pinnacle Leather Conditioner. These conditioners are calibrated to nourish and moisturize. They are engineered at a molecular level, to absorb deep into the fibers' cells, allowing these fibers to retain their resilience, and thereby inhibit premature aging. Proper conditioning allows fibers to retain flexibility and softness.

WARNING! Often inexpensive brands of leather conditioners contain gloss agents and petroleum distillates, silicone or silicone oils, which cling to the surface and then are wiped onto clothing. They leave a greasy finish that can transfer to clothing. For the health of your leather, choose a water-based, pH-balanced leather conditioner.

Many popular conditioners, like Lexol Spray Leather Conditioner and the product recommended especially for the Bentley, Jaguar and Rolls lines, Connolly Hide Care Conditioner, are pH balanced, have stain repellants, and waterproofing agents to protect your beautiful interior from accidents. The Wolfgang Leather Care Cockpit Kit contains all the tools you’ll need, AND Wolfgang's leather products are pH balanced. If you only want the best for both leather and vinyl, there is simply no better comprehensive choice for ”state of the art” cleaners, conditioners and applicators than our specially packaged, Pinnacle Concours Interior Kit.

With a little time and the right chemicals, your vehicle's leather will remain soft, supple, and inviting for years to come!


Click Here for more Leather Care Products
 
(from: http://www.autogeek.net/leather-car-care.html)

Tuesday, June 11, 2013

Detailing Tricks and Tips

by Prentice St. Clair

The professional detailer understands that detailing is both "art and science." The "science" of detailing includes such concrete elements as chemicals, equipment, knowledge of vehicle surfaces, industry standards, and customer requirements. The "art" of detailing is the activity of combining these elements into procedures that work for each specific situation. Success in doing so yields quality service and, ultimately, a delighted customer. This should be one of our primary goals as professionals.

In our quest to achieve quality service, we educate ourselves in the "science" aspects of detailing by attending seminars, workshops, and conventions; maintaining memberships in professional detailing organizations, and scouring through industry trade magazines. And, of course, we constantly experiment with new products and equipment in an effort to fine-tune our procedures in such a way as to optimize efficiency and effectiveness. "Efficiency" is a measure of the quickness of the procedure whereas "effectiveness" is a measure of how well the procedure actually works. Obviously, anything that increases either of these measures is of great benefit to us and our customers.

Surprisingly, however, I have found that some of the best tips and ideas have come from informal chats with other detailers, both at seminars and during visits to their shops. The remainder of this article is dedicated to some of the tips and time-saving ideas that have worked well for me over the years. Some of this stuff may be standard procedure for you. Some of it may seem silly or impractical at first glance. However, I urge you to try the new ideas and tips--you may just find that, after you have gone beyond the "newness" of the procedure, you save yourself some time or yield superior results in the same amount of time. Either way, your bottom line will increase!

Interior
When cleaning carpets and upholstery, start with the driver's area first. It is then more likely that this area will be dry when the customer takes possession of the vehicle.

Clean windows after cleaning everything else inside, thus preventing soiling of the windows while doing the dirty work of cleaning door panels and headliners, et cetera. Do your interior dressing and conditioning after window cleaning so as to avoid tracking dressing onto the windows while wiping them.

When cleaning windows, first lower the windows slightly and clean the top edge of the window pane. Then fully close and clean the remainder of the window.

Be careful not to get any of your favorite interior cleaner on the clear plastic panel that cover the instrument panels. These cleaners can spot or fog the plastic.

In heavy carpet soiling situations or if there has been a spill between the seats, it is often easier to remove the seat completely from the vehicle, allowing excellent access to the soiled area for more thorough cleaning. I have found that, especially in neglected interiors, the time it takes to remove the driver and passenger seats is easily made up by the ease of access to the interior of the vehicle during the heavy cleaning that is necessary in these situations.

Be careful to check for wire harnesses under the seat. These usually come out of the carpeting directly under the seat and simply unplug.

Of course, be sure to re-plug the harnesses and securely re-tighten the seat upon re-installation.

Always rinse mats, carpeting, and upholstery after cleaning them to remove any cleaner residue. This residue will simply attract more dirt if left in the material. That is, the material will stay cleaner longer if rinsed.

Engine Bay

Clean the engine bay before washing the vehicle so that any grease and dirt that lands on the vehicle during engine bay cleaning will simply be washed off during the wash step.

Drape wet towels over the front fenders to protect the paint from the spotting and streaking that can occur when using strong cleaners and degreasers. This also protects against scratching while you lean over the fenders to work the engine bay.

Wear safety goggles and an apron to keep yourself clean and protected.

Especially in foreign cars, the computer and electronic modules are often located in a separate compartment in the upper left- or right-
hand corners of the engine bay. Keep water out of this area to reduce the possibility of damage to these components. Instead, wipe them with a damp towel to clean off any dirt or dust.

A dressed engine of course looks incredible, but also attracts dust quickly. To reduce this, wipe off the excess dressing with a clean towel.

Exterior
Wash the lower areas first--wheels, wheel wells, kick panels, et cetera--before washing the rest of the car.

In regular washing situations, especially with darker colored cars, this has been extremely helpful: lightly spray your favorite "quick" liquid wax directly onto the dripping wet painted surfaces after the final rinse. Then dry as normal with a chamois. Finish by lightly buffing the painted surfaces with your finest "wax-off" towel. This will remove any remaining water spots, add some depth to the paint, and leave a great shine.

Always clay at least the horizontal panels (hood, roof, trunk) before waxing or sealing, even in express detailing situations. The impact of this activity is huge--have the customer feel the resulting smoothness--and it only takes a few extra minutes.

Some clay bars can be used during the wash step, using the car wash solution as the lubricant. This is especially effective for vehicles that are detailed frequently because the build-up of fallout between waxings is minimal. However, for heavy fallout or over spray removal, it is best to wash and dry the vehicle and then use the clay bar with the recommended lubricant (usually a "quick" liquid spray wax); this allows you to check your work more carefully.

Dress the trim (all rubber, plastic, or vinyl pieces that are adjacent to painted surfaces) and tires before waxing or sealing. This has two benefits:
ï It is much less likely that these surfaces will absorb the wax product, thus greatly reducing the amount of final wax removal in these areas
ï It takes much less time to apply the dressing to these areas because there is less worry about getting dressing on the paint--any sloppiness will simply be taken up during the waxing process.

Don't forget to dress the wheel wells by spraying inexpensive or diluted dressing into them. Most wheel wells are lined with black plastic panels or black anti-rust coatings. Both of these materials respond well to even the most inexpensive dressings. Does this seem silly? Next time you are driving at night and your headlights hit a clean car, look at the wheel wells; are they clean and dark black or dirty and light tan? Which one looks better?

There are many ways to distinguish between clearcoat and conventional paint systems. An especially easy way is to take a small amount of your favorite polishing compound on a white rag and rub a small and inconspicuous painted area of the vehicle. If the color of the vehicle comes off on the rag, the paint is conventional. If not, it is most likely clearcoat.

I hope you find these tips helpful. If even one of them saves you some time or helps you achieve superior results, this article will have been a success. Most importantly, share your tips with other detailers and ask them about theirs. If we foster a spirit of "friendly" competition, we will all profit; and certainly, there are plenty of vehicles out there that need the attention of the relatively few truly professional detailers that exist.


Copyright 1999, Prentice St. Clair.

First published in the October, 1999 issue of American Clean Car
(Volume 28, Number 5)
 

Exterior Car Detail Tips : Car Detailing: Windows


from: http://www.youtube.com/watch?v=B6MqPVBNQBk

21 Detailing Tips from the Pros!

A little prep is all it takes to make your ride shine

Feature Article from Hemmings Sports & Exotic Car

July, 2006 - Craig Fitzgerald and George Mattar

We see an awful lot of cars in this business, traveling as we do to auctions, concours, car shows, national conventions and neighborhood cruise nights. The only way to rise to the top of the heap among all the other nice cars out there is to be absolutely obsessive about detailing a car. A top-quality, well-planned detail job can turn a twenty-footer into a standout when it comes time to pick up the trophies, or wring those last few dollars out of a potential bidder at auction.
We spent hours on the phone and online with experts around the country, learning their secrets and applying them to our own nasty cars, in the hopes of making them look a little more presentable for shows, and for everyday driving as well. When it gets right down to it, attention to detail and frequency of a proper cleaning make the job a lot easier when you really have to do it.
Everything we're showing here we've tried ourselves. We've also gotten tips from George Mattar (our own on-staff professional detailer). He ran his own detailing business for decades and had hundreds of happy clients.
We've learned a lot, and we thought we'd break it all down into manageable bites. We hope you'll pick up a few pointers you can use to keep your own car at the top of its game.
Photo 1: Eric Eadington of Flawless Auto in Newport Beach, California, gave us the cardinal rule of detailing: "The final finish is 90 percent in the prep," he says. "The most common misconception is that a wash and wax will give a show-car shine." Hey, I think we've heard that rule before, and it was the same for painting a car.
Photo 2: Everyone we talked to had this piece of advice: READ THE DIRECTIONS. Every product is different, and how you apply it can mean the difference between a satisfying experience and a huge letdown. Take three seconds and read the back of the package.
Photo 3: We'll warn you right up front: Get a password to Autopia.org and you're going to be spending a lot of "work time" surfing around looking for killer detailing tips. It's a great Web site populated by both professional detailers and folks who just like to have ultra-clean cars. Anything you should know, you'll definitely find here.
Photo 4: You know how to wash your car, right? We thought so, too, but we've recently been using the two-bucket method, and we'll never go back. Get yourself two buckets, and fill one with plain rinse water, and one with your soap and water solution. We got these two ten-gallon buckets for free from a local company that makes batteries. As you're washing, rinse your wash mitt or brush in the rinse bucket before you pick up soapy water. It will float the grit out of your mitt and not grind it back into the paint.
Photo 5: French chefs call it "mise en place" or "everything in its place." It refers to everything you need for a particular job being laid out in a place where you can reach it. We laid out all of our items on a wheeled cart so that we could roll it around the garage a bit easier. We also started with wheel cleaner on the right and worked our way through the job to the left to keep all of our chemicals separate.
Photo 6: Clay bars have been the secret domain of pro detailers and bodyshops for years. We spoke to Mike Pennington at Meguiar's, and he noted that as long as you start with the least aggressive clay and keep the painted surface lubricated with a spray detailer (even a mild solution of carwash and water will work), there's nothing you can do to harm your paint. You'll feel it take surface contaminants right off the paint.
Photo 7: Here's what we mean when we say "swirl marks." They appear when a fine bit of grit is placed between your wash mitt, wax applicator or chamois cloth and the painted surface. Eric Eadington sent us these before and after shots of a Dinan M5 he had in his shop. Removing them requires patience, some swirl remover and a dual-action buffer.
Photo 8: For really nasty swirls, you're going to have to call in the reinforcements. If you can't find a dedicated swirl remover at your local parts house, check your phone book for an auto body supply store in your area.
Photo 9: The tool on the bottom is a Porter Cable dual-action buffer. The yellow one on the top is a DeWalt variable speed polisher. One you could hold on the paint for half an hour and not do anything too bad. The other could grind the paint off a battleship in half a second. Learn the difference. (Hint: buy a dual-action buffer and leave the polisher to the pros.)
Photo 10: Autopia.org regular Steve Mynott had this killer glass-cleaning tip: Wipe the glass in vertical strokes on the outside, and horizontal strokes inside. That way, if you have a streak, you'll know what side of the glass it's on.
Photo 11: We're going to warn you right now: This stuff is addictive. Sprayway is like the Krispy Kreme donut of glass cleaners. First off, it leaves an absolutely streak-free shine on the glass. Second, it stays put, unlike most glass cleaners that dribble all over the place the second they leave the bottle. And third, they haven't invented a sexier scent since the damp mimeograph sheets Mrs. Walsh used to hand out in third grade. Yummy.
Photo 12: There are three basic levels of wheel cleaners on the market today, which we've ordered from least aggressive to most aggressive. Read the directions and know what you're about to spray on your wheels. And don't forget that whatever you're spraying on the wheels is also going to be sprayed all over the brake calipers, rotors and suspension parts, too. Better to start cleaning your wheels with nothing more than carwash soap and water, and work your way up.
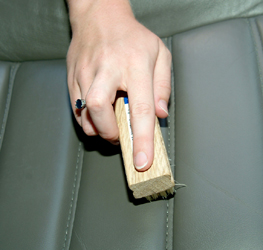
Photo 13: Stainless steel trim can get seriously oxidized from years of acid rain and other contaminants. We cleaned up Mike's trim with a bit of Mother's Mag and Aluminum Wheel polish, and got jiggy with a wad of #00 steel wool. Be sure to try it on an inconspicuous area, though. Like on the car next to yours.
Photo 14: Places where you rest your arm or hand (like your steering wheel, shift knob, or armrest) are guaranteed to be the nastiest places in your interior. Managing Editor Mike McNessor's 1983 Mercedes 300 SD was pretty grungy inside when he bought it, so we hit it with a heavy-duty interior cleaner (Meguiar's #39 we bought at a car show), and scrubbed it lightly with a toothbrush. You couldn't find nastier stuff inside the Fry-O-Later vent at Burger Whopper.
Photo 15: Whenever you use a harsh (usually marked "Heavy Duty") interior cleaner, be sure to apply something afterward that has some UV protection.
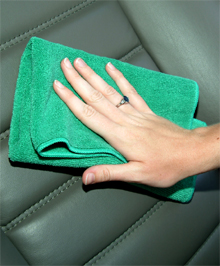
Photo 16: Mark your microfiber towels to indicate what they're for. Mark several with "G" for "Glass" and don't use them for anything else. Don't even wash them with your other towels, because wax will impregnate itself into the fibers and you'll never get them to clean the glass the same way.
Photo 17: WD-40 or a similar lubricant is an excellent bug and tar remover, and about as cheap a solvent as you can find. Just be sure to rewax any portion of the car you cleaned with it.
Photo 18: This is a product called Optimum No Rinse Wash and Shine. For those of you living in water-restricted neighborhoods, or those of you who hate the idea of blowing 50 gallons of water every time you wash your car, you can get a pretty effective wash done with just a gallon of wash water and a gallon of rinse water. The idea is that it very effectively floats the dirt off the paint without requiring gallons of rinse water.
Photo 19: Jeremy Bingham from Perfect Finish in Indianapolis, Indiana, sent us a great tip: For interior cleaning, use a solution of six parts water and one part Woolite. "It's very gentle, and it works wonders," he says.
Photo 20: We took Jeremy's suggestion, but we picked up an off-the shelf solution: Woolite Oxy Deep. We had a blue ink stain on a rear floormat and the stuff took it out with no discoloration of the mat. Amazing.
Photo 21: Mike's Benz had a spot of pine sap deposited on the hood around the time of Ronald Reagan's first inauguration. We hit it with a little isopropyl alcohol from the medicine cabinet. It'll take some rubbing compound and a buff to get that spot out. Better to carry some spray detailer and a microfiber towel with you and take care of it immediately.
This article originally appeared in the July, 2006 issue of Hemmings Sports & Exotic Car.
Order Backissues of Hemmings Sports & Exotic Car | Subscribe to Hemmings Sports & Exotic Car

(from: http://www.hemmings.com/hsx/stories/2006/07/01/hmn_feature1.html)
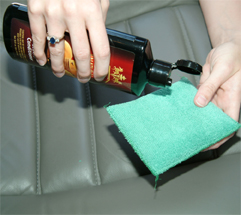
Thursday, June 6, 2013

Mobile Detailing: DIY Car Cleaning Tips

May 21, 2012
There are days when you need the help of a professional mobile car detailer to service your car from top to bottom, but there are also days when you can just pick up the cleaning mitts and chemicals and do the job yourself.
 
Car owners today are wising up to the new technological advancements in the car care industry. They are now looking for cheaper, more convenient, and even environmentally-friendly ways to clean their car. Instead of just dumping dollops of car shampoo onto their car’s surface, they carefully peruse different cleaning products to find just the right kind of cleanser to deliver the results they want. Consequently, vehicle owners today are better-informed and better-equipped to handle the average car problem on their own.
 
DIY car cleaning at home
 
While your mobile car detailer is still the person to approach for any type of car cleaning need, you can also make his job a little lighter by doing some basic cleaning chores yourself.
 
Of course, you can’t simply cancel all your car care appointments and just do the cleaning yourself—your car will suffer in the long run if it consistently receives sub-par cleaning services and is treated to harsh chemicals all the time. Nothing beats expert training in knowledge when it comes to managing your car inside and out.
 
You can prolong your car’s amazing appearance and functionality if you perform these easy-to-do cleaning tips in between your mobile detailing schedules. You don’t need fancy equipment or expensive cleaners to help you achieve the squeaky clean, mirror-like clean that you want.
 
Things you need
·         Vacuum
·         Car shampoo and conditioner
·         Car wax
·         All-purpose cleanser
·         Calico cloth/microfiber cloth
·         Buffing mitt
·         Garbage bag
·         Hose
·         Degreaser
·         Brush
 
Interior cleaning
1.       Take out the carpets, loose change, newspapers, candy wrappers, and any other junk from the car. This will let you work with empty spaces and help you get to the farthest corners of your car.
2.       Swipe at the interior of the roof, cubbyholes, knobs, buttons, and dashboard with a clean cloth. Spray on a generous amount of all-purpose cleanser to get rid of fingerprints, residue, and dust streaks.
3.       Vacuum everything. Your mobile car detailer works from top to bottom, so you should also do the same. This way, all the dust and dirt will accumulate on the floor, the better for you to get to them immediately.
4.       Take off the car seat covers and other upholstery and vacuum them out of the car. You can also wash them in your car shampoo of choice to take out any deep-seated stains.
 
Exterior
1.       Douse the car’s body with water and the appropriate amount of cleaning chemical. Just remember to read the label of every chemical cleanser you buy and ask your car detailer’s opinion about which product is best for your vehicle.
2.       Use a microfiber towel or any other non-abrasive fabric to scrub your vehicle with. Mobile detailing experts are very careful to use only the gentlest cloths to use on the car’s body work in order to prevent hairline scratches on the finish.
3.       Warm up the engine and protect sensitive areas in aluminium foil before applying degreaser to your engine. Use a brush to work at the grease that is stuck on the small parts of your engine. Unlike the car’s interior, work from the bottom so that the grease doesn’t drip down to the areas you already cleaned.
4.       Pay special attention to the wheel spokes, mud guard, and the space under door handles. These are the places where dirty water and dirt are more likely to accumulate.
5.       Wipe down the car before applying a generous amount of car wax to finish off the job
 
 Mobile car detailers will advise you to work in small concentric circles when applying the wax so you don’t miss a spot. Apply a scratch and dent remover if necessary.
One last piece of advice: people think that they should wash their car in a sunny place so that it will dry quickly, but sunlight actually promotes water streaking on the car’s exterior. Instead, choose a shady, well-ventilated space to do your mobile detailing at home.