Here’s how to get your vehicle ready for those weekend getaways, vacation drives, and summertime road trips. Of course, it goes without saying that routine washing is necessary, but once you’ve got that taken care of, here are some additional things you can do.
Wax Your Car To Bring Out the Beauty
Once you’ve got a clean car, next comes the wax. Wax applies best on a cool surface, and since hot and/or direct sunlight causes it to dry quickly. For detailed information on waxing in the shade, see this article. If your car has a clear auto bra product installed on it, you may notice some buildup along the edge of the protective film when you apply your wax; simply use your cloth to remove it before it dries. If you notice your wax jobs don’t last long, you may need to use a specialized car product called a paint cleaner. This product will prep the painted surface to remove anything regular washing left behind. Your wax job will last longer and look better.
It’s an Inside Job
The interior of your car needs attention to both stains and odors. Since driving around all winter with the windows closed has most likely left an unpleasant, stale aroma inside your auto, getting it freshened up will make you and your passengers happier, especially on long drives. The main cause of unpleasant smells inside your car is bacteria; bacteria tend to grow in carpeting especially, so cleaning your floor carpeting and mats will go a long way to removing odors. Once your carpet is clean, have it treated with Scotchgard to resist odor-causing stains from settling in.
Next, clean your upholstery and the interior of your car. If you’ve got leather seats, be sure to use a product that specifically states it can be used on leather; other products can dry and crack leather. Once your seats are clean, we again recommend you have them treated with Scotchgard to keep them that way.
Don’t Forget the Wheels
Clean car wheels get attention, but just rinsing them down or sloshing with a soapy sponge won’t do the job. You’ll need to scrub them well, using a tire cleaner for the rubber and a wheel cleaner for the metal. Your wheels have picked up a lot of gunk and residue from this past winter, especially if you drive on salted or deicer-treated roads. Once your wheels are clean, a metal polish and sealant can keep them looking shiny.
Pay Attention to the Trim
UV rays can cause plastic and rubber car trim to fade or turn gray. Once you’ve got them clean, a plastic sealant can bring the look back closer to original condition, and then protect it from further deterioration.
(from: http://skipchips.com/paint-protection/is-your-car-ready-for-summertime-driving/)
Friday, May 31, 2013
How to Remove Dead Bugs off Your Car
Everyone who drove a car for more than twenty miles can relate to this: bugs sticking to the front of your ride are ... well, bugging the hell out of you. And just as rain always seems to come right after you finished hosing and waxing your car, so too the creepy crawlers tend to come out just as you've given your ride a mirror-shine buffing.
Here are but a few methods of getting rid of those pesky marks left by the demising insects. But before we get into that, let's take the time to understand why bugs are so particularly difficult to remove from the car, no matter where they hit: the grille, the hood or the windshield.
Some of these buggers tend to contain acidic substances which is why some of the time they tend to bite into the paint. That will cause you a bigger pain in the derrière after the bugs get a chance to dry out, because then it will be even more difficult to get them off without chipping the paint.
Most of us will take the mechanical removal approach, forcing the scratch resistance of our paint job, while others take a more scientific approach to it. Attacking the problem from a chemical point of view is often better than using sharp or pointy objects so close to your precious (and sometimes expensive) paint job.
Many people recommend soaking the bug stain for a couple of minutes with the wondrous solution known as WD 40 which is a penetrating oil sold in most hardware stores. Just spray on the dead bug, let it penetrate for a while and then simply rub it off with a clean cloth.
Another idea is to stick to classic bug and tar removing products but as some of the people out there might know, these don't always work, which makes it frustrating spending the money in the first place.
A good scrub might sometimes to the job, so before you go spending money on the “super wash” version at you local car wash, try to see if you can't do the job yourself in your driveway. Since you care so much about your car, you're bound to put more heart into the matter and thus get a better result.
When all else fails, when the scrubbing, the spraying, the wiping and even the grinding down come to no avail, you have only one option left: a new paint job.
The other nasty place where bugs tend to stick is the windshield, which is even a more tricky place to clean, since you can't really use oil-based products. The idea here is pretty much the same, let the stain soak for a while before attempting to clean it. You can do this by covering up the spot with a cloth soaked in special cleaning soap or another cleaning product.
The best idea is to use a microfiber cloth on your windshield as they don't leave as much lint as a regular fabric would. These go very well with the water-soap combination and a big plus is that they don't cause a dent in your budget either. For extra-sticky spots, try adding a little baking soda to the water. Its granules are small so they won't cause scratches to the glass.
The next solution is not for the faint-hearted and it requires a steady hand. Try rubbing the smudge with a light scouring pad, like a “000” steel wool. This will remove those stubborn bug residues that you can't normally get off with soap and water.
A less conventional method of removing bug stains from your windshield is to use a little Coca-Cola. The chemical composition of the drink will dissolve the bug juices and make it easier to remove. All you have to do is be careful not to get any on your paint job. At the end, make sure you scrub it with a little soap and water, to wash off the Coke.
Some of these solutions might seem a little too extreme if your car is either very expensive or very rare. But in that case, you probably have the dosh to get a professional scrub. For the rest of us, the hoi polloi, the idea is to try cleaning these stains as soon as possible, because once they dry up, the acid in the bugs has the time to eat into the paint.
(from: http://www.autoevolution.com/news/how-to-remove-dead-bugs-off-your-car-1373.html)
Thursday, May 30, 2013
Professional Detailing Tips: How to Polish your Car
There has been a rumbling amount of noise and confusion, partly due to product manufacturers, regarding polish. Isn't it just wax that shines and protects? If I wax there's no need for Polish. A two in one polish is sufficient. And so on. Before you can learn how to polish your car like professional detailing companies, you should first know exactly what a polish is-and why you need both a polish and a wax for optimal results.
Polish is an abrasive that actually removes a thin layer of paint in order to smooth out the finish and reveal a high gloss shine. The two types of polishes, pure polish and cleaner polish are meant to provide brilliant shines in different situations. Pure polish is used by detailing services providers on cars with an already impeccable finish-used to add the unmistakable, clear reflection gloss that only a polish can. Cleaner polish is an abrasive used to even out surface scratches on cars with imperfect finishes which provides a smooth beautifully shined result. In either case, polish is an abrasive and should be used before waxing.
What exactly is wax for? Waxing your car is solely to protect its shine and finish. Therefore, the shine should already exist if you are to protect it. While waxing will/can produce shine to a dull car finish, it will not directly address the problem like a polish will. Now that we've distinguished the two, lets discuss how the detailing services providers suggest polishing your car be done.

By Hand or Machine?

There are two ways to apply polish to your vehicle-by hand or by using an orbital or rotary buffer. Both methods require a little practice, the buffer more than by hand, but either can be used to provide the gleaming result the detailing services perfect.
If you decide to polish by hand, you don't run the risk of burning through or damaging the paint. If you're confident in your machine buffing skills then go for it, otherwise leave it to the professional detailers. For the sake of this article, we'll explore the hand polishing method.
Before polishing, you have to thoroughly wash your car with a car-specific cleaning gel or soap and a soft car sponge. Doing so ensures removal of surface grime and contaminants. Dry your car completely using a microfiber based towel. Terry towels are often used but leave behind pieces of fabric which adds a dusting step to the process. After washing, use a clay bar or product, coupled with a detailing spray and dry microfiber towel, on the areas of particularly stubborn debris and impurities to clean your car. Now it's time to polish!
Tip: To know which polish to use, run the tip of our finger or fingernail along your vehicle. You're looking to feel any scratches. If you don't your cars finish is in amazing condition and you can apply a fine polish. For those with some imperfections to work out, here's the process.
- Apply a more abrasive polish (medium grade). Although the paint and clear-coat layer is really thin, especially on factory paint jobs, an aggressive polish shouldn't harm it. Again this type of polish is required for finishes with scratches you can feel but that are not deep past the paint layers and into the metal. For deep scratches you'll want to use a fill in paint and a mild sand paper to smooth the area before you polish.
- Start with a 2x2 section of the car and using a microfiber towel apply the polish-an amount equal to the size of a nickel works well.
- You'll have to fold the towel so that it fits comfortably in your hand. Polishing like the detail services requires pressure. If you hold the towel comfortably you can apply even pressure for better results.
- Apply the polish using a circular (clockwise) motion to evenly apply it to the area. Then using diagonal, up-down and left-right motions, work it in.
- Once the compound turns clear and breaks up evenly, gently wipe it off. Use excellent lighting because you'll need to check your work before moving on the next panel. The better you can see, the more impeccably you can polish.
 Expert Tip: Don't apply a polish or rubbing
compound at heavier grade than medium to dark colored cars. Should your scratches require filling in, seek the opinion of detailing services provider before trying to DIY. This is because hand waxing, while safer, can only correct so much.
2. Applying a finer grade polish requires the same above mentioned steps minus the
filling in of scratches.
filling in of scratches.
Once you've successfully completed the first 2x2 area with beautiful results, move on to the next until you've completed every area necessary. Don't forget, you have to protect your work so remember to wax any area that you polish, every time.
How to properly detail a car
by B. Leslie Baird
Created on: November 27, 2011 Last Updated: June 30, 2012
Car detailing may be done by a dealership before the new owner picks up the vehicle. It is also commonly done on used cars before they are sold. Many vehicle owners like to have their cars detailed on a regular basis to keep them in like-new condition. Properly detailing a car is not a difficult procedure and the results can be impressive.
before they are sold. Many vehicle owners like to have their cars detailed on a regular basis to keep them in like-new condition. Properly detailing a car is not a difficult procedure and the results can be impressive.
Detailing can involve a quick process of cleaning on the interior of a car or it can include an extensive procedure on the exterior and interior. Begin the job by gathering all the necessary cleaning supplies and choose a day that is suitable for working outside. The work can be done inside a garage if one is available.
or it can include an extensive procedure on the exterior and interior. Begin the job by gathering all the necessary cleaning supplies and choose a day that is suitable for working outside. The work can be done inside a garage if one is available.
Proper detailing supplies can be gathered in an empty five-gallon bucket to help the job go smoothly. Supplies include window cleaner, paper towels or old newspaper and a supply ofclean rags. Upholstery cleaner, an upholstery brush or stiff bristled brush, a leather and vinyl protector, and a fabric refreshing spray should also be included. A wet-dry vacuum and a separate container with warm soapy water will complete the supplies for an interior detailing.
rags. Upholstery cleaner, an upholstery brush or stiff bristled brush, a leather and vinyl protector, and a fabric refreshing spray should also be included. A wet-dry vacuum and a separate container with warm soapy water will complete the supplies for an interior detailing.
Begin by removing all personal items and trash from inside the vehicle. Remove the floor mats and shake any loose dirt from them. If the floor mats are rubber, they can be scrubbed with soapy water and allowed to dry. If they are carpet mats, vacuum them thoroughly and apply cleaner to any spots. Next, vacuum the entire inside of the vehicle including the seats and between the seats.
. Remove the floor mats and shake any loose dirt from them. If the floor mats are rubber, they can be scrubbed with soapy water and allowed to dry. If they are carpet mats, vacuum them thoroughly and apply cleaner to any spots. Next, vacuum the entire inside of the vehicle including the seats and between the seats.
Windows and mirrors should be cleaned with a quality glass cleaner. Wiping mirrors and windows with old newspaper provides the cleanest shine without towel residue. Do not forget to clean the instrument panel surfaces and door handles as well. As a final touch, cotton swabs can be used to remove any debris stuck in tight spaces.
If the vehicle’s seats are a cloth material, upholstery cleaner can be used to treat any spots. Vinyl or leather seats can be cleaned with an appropriate cleaner. Ensure that the cleaner does not leave the seats slippery. The dashboard, door panels and center console should also be cleaned with the vinyl cleaner and buffed with clean dry rags.
can be cleaned with an appropriate cleaner. Ensure that the cleaner does not leave the seats slippery. The dashboard, door panels and center console should also be cleaned with the vinyl cleaner and buffed with clean dry rags.
Finishing the seat and carpet cleaning with a light spray of fabric refresher should remove almost all odors. If the interior still does not smell fresh, specialfogging air fresheners are available. Adding a regular car air freshener can help keep the interior odor free and add a personal touch to the vehicle.
Exterior detailing can be a more complex procedure and care must be taken to ensure that the correct products are used to avoid damaging the vehicle’s paint and chrome surfaces. Cars should be washed and waxed in the shade to prevent soapy water or wax from drying too quickly. Micro fiber wash mitts will help reduce fine swirl scratches in the paint surface. Proper detailing of the interior also includes washing the tires and hubcaps and finishing the tires with a tire cleaner - protectant.
should be washed and waxed in the shade to prevent soapy water or wax from drying too quickly. Micro fiber wash mitts will help reduce fine swirl scratches in the paint surface. Proper detailing of the interior also includes washing the tires and hubcaps and finishing the tires with a tire cleaner - protectant.Interior Car Detailing Tips from the Pros

#1: Get the right products!
There are many types and brands of interior cleaning products. Depending on the material you are cleaning, you may need several products. For the leather portions, make sure to use leather cleaner.

#2: Soft cloth - or socks!
Spray your cleaner directly on interior surfaces, like steering wheel, dash board or onto a clean, soft terry cloth. An old cotton sock works well too!

#3 Toothbrushes & cotton swabs!
Use a toothbrush to remove stubborn stains and keep a bag of cotton swabs handy for interior crevices, steering wheel dashboard and center console! You'll be amazed at how much better the car looks when you clean all the detail spots.

#4: Glass cleaner makes it shine!
Glass cleaner puts a nice shine on interior plastic (dashboard, center consoles, etc) as well as the windows!
(from: http://www.mossynissan.com/blog/2013/may/28/interior-car-detailing-tips.htm)
Why you should wash your car AFTER it rains
Pollutants such as sulfuric and nitric acid get trapped in
rain drops and snowflakes that settle on your car. When they evaporate they
leave behind a concentrated acid that will damage your vehicle’s finish over time
Tuesday, May 28, 2013
Car Exterior Cleaning: Basic Detailing Procedures
Posted by detailxperts on November 26th, 2012
If your idea of automotive detailing is a quick spin through the local car wash, followed by plopping 4-quarters into an industrial vacuum – chances are you’re more of a car owner, than a car lover. Exterior detailing involves four main activities. The first is to prep wash the exterior to remove dirt, dust, and other loose contaminants. Next, the paint is cleaned and rejuvenated as necessary to make the paint surface look great. Then, protection is applied to the paint surface to keep it looking great. Finally, other exterior surfaces are detailed. Before beginning the exterior detail, conduct a complete inspection of the outside of the vehicle. Check the bumpers, spoilers, and rocker panels for scrapes, scuffs, and excess kicked-up foreign material like tar and road striping. What you’ll need depends on the condition of your car’s finish. If your car has been regularly washed and waxed, you will probably only need a few detailing products:
Prep Wash: First, conduct the prep wash. The purpose of the prep wash is to remove loose dirt, dust, and debris from the vehicle. Since the vehicle is to be detailed and wax applied, it is permissible to use harsher cleaning chemicals during the prep wash. Remember to always wash from the top down. This process also includes wheels & wheel wells. Maintaining a clean finish will help prolong your wax or sealant on your paint. This step should be done weekly.
Claying: Some technicians prefer to use detailer’s clay during the prep-wash step. If doing so, first wash the vehicle and rinse it thoroughly. Then clay the vehicle, using a new batch of car wash shampoo as clay lubricant. Finally, rinse the vehicle and thoroughly dry it. Using detailer’s clay during the prep wash is recommended for vehicles with minimal surface contamination. The advantage of claying as a separate step after drying the vehicle is that you can be more thorough and monitor your results as you rub the vehicle’s surface with the clay. After claying the car, the surface should feel noticeably smoother. Periodically flatten and fold the clay to expose a clean surface. There’s one major caveat: Don’t drop the clay! Dropping the clay renders it useless, as it will pick up dirt that can scratch the car.
Polish: Next, perform any necessary polishing steps. The purpose of polishing the paint is to remove minor sub-surface damage and shine the paint surface. A true polish will not add any protection to the paint surface – this is saved for the waxing step. Polish smooths, clarifies, and cleans the surface of your car. Polishing will remove some small scratches, but it can also remove paint, so if you polish by hand, be careful to use light pressure. This step should be done 1-2 times a year.
Protection: Once the vehicle’s paint has been rejuvenated to your satisfaction, it’s time to protect that fresh paint surface with either wax or paint sealant. A high-quality wax will typically provide three to six months of protection. A polymer paint sealant will typically provide six to twelve months of protection. This step is your protection for your paint, it will also add gloss and wetness to the paint. Apply the wax directly to the applicator, not the car, and work on one small area at a time. This step should be done every 2-6 months.
Final Detailing: Next, spend some time on the other exterior surfaces that may need attention. For example, chrome trim can be polished, the wheels and doorjambs can be spray-waxed and wiped, and the windows should be cleaned and wiped to a streak-free finish.
(from: http://www.detailxperts.net/blog/2012/11/26/car-exterior-cleaning-basic-detailing-procedures/)
- Microfiber towels (the more, the merrier!)
- Black-trim treatment
- Spray-on detailer
- One-step polish/wax
- Wax applicators or orbital polisher
- Clay bar
- Mild polish or pre-wax cleaner
- Wax
If your car hasn’t been waxed recently or has a neglected finish, you might need to call in the heavy artillery:
The most visible and possibly most important part of any detailing job is the exterior. Exterior detailing consists of rejuvenating and protecting the exterior surfaces of the vehicle. taking into consideration the condition of the vehicle, perform the necessary steps to make the exterior look as new as possible. Properly cleaning and treating your car’s paint will add more to your car’s appearance and value than anything else you can do to it. You can always schedule an appointment with your local professional detailer.
(from: http://www.detailxperts.net/blog/2012/11/26/car-exterior-cleaning-basic-detailing-procedures/)
Auto Detailing Guide – Exterior Car Trim
Posted by BAsafa on May 28th, 2013
Washing, scrubbing, and waxing your car should be a regular chore for you if you want to keep it looking like new for years. The importance of consistent maintenance and upkeep cannot be overemphasized when it comes to a machine that suffers through daily abuse from the elements and wear and tear.
If only every car owner treated his car like the investment that it is, and detailed it religiously as recommended, we wouldn’t be seeing dirty, ugly, inefficient vehicles on the road at all. And cleaning your car doesn’t just mean hosing it down with water or scrubbing it half-heartedly every weekend. You have got to learn DIY detailing, and call in your professional car care experts every once in a while, if you wish to keep your car’s pristine condition for the rest of its lifetime.
A generic cleaning product can work well for most surfaces of your car, such as the hood or the leather upholstery. However, some areas do require special attention, such as your tires, your headlights, or your exterior trim.
Exterior car trim is usually made out of PVC, plastic or rubber. It is usually attached to the car’s bumpers and fenders, door handles, and side panels. Once you have the car trim in place, you’ll instantly notice how much more streamlined and impressive your car looks.
Before washing your car, be sure to remove any wax or protectant that has been previously applied to your rubber or plastic trim. Wax repels water, and you wouldn’t be able to clean the exterior car trim properly if wax is still present on it. Use a mild but effective car wash shampoo that works well on both metal and plastic or rubber so you don’t have to buy two kinds of cleaning products. You can apply a soft brush to remove caked-on mud and dirt on the trim.
Once the trim is completely dry, apply your desired protectant product to keep the plastic or rubber from drying out. If the trim on your car has already faded to a dull color, you can also use a trim restorer to bring back its color and sheen
(from: http://www.detailxperts.net/blog/2013/05/28/auto-detailing-guide-exterior-car-trim/?utm_source=feedburner&utm_medium=feed&utm_campaign=Feed%3A+detailxperts%2Fsgki+%28Detailxperts.net+website+blog%29)
Washing, scrubbing, and waxing your car should be a regular chore for you if you want to keep it looking like new for years. The importance of consistent maintenance and upkeep cannot be overemphasized when it comes to a machine that suffers through daily abuse from the elements and wear and tear.
If only every car owner treated his car like the investment that it is, and detailed it religiously as recommended, we wouldn’t be seeing dirty, ugly, inefficient vehicles on the road at all. And cleaning your car doesn’t just mean hosing it down with water or scrubbing it half-heartedly every weekend. You have got to learn DIY detailing, and call in your professional car care experts every once in a while, if you wish to keep your car’s pristine condition for the rest of its lifetime.
A generic cleaning product can work well for most surfaces of your car, such as the hood or the leather upholstery. However, some areas do require special attention, such as your tires, your headlights, or your exterior trim.
The beauty of car trim
The trim on your car is a snazzy decorative molding that could have come with it straight from the factory, or perhaps you simply had it added to your vehicle as an after-market customization piece. Black exterior car trim adds drama and flair to any color vehicle, and it also sets your car apart from the many other vehicles of the same make and model traversing the highways. It accentuates the lines of your vehicle and provides weatherproofing qualities as well.Exterior car trim is usually made out of PVC, plastic or rubber. It is usually attached to the car’s bumpers and fenders, door handles, and side panels. Once you have the car trim in place, you’ll instantly notice how much more streamlined and impressive your car looks.
Caring for your car trim properly
Your car trim is made from a completely different material from the rest of your car, and if you’re not careful about picking your cleaning products, you might end up unintentionally damaging or peeling it off your vehicle. In time, even the toughest car trim can dry out, crack or fade, and you’ll be left with ugly straight lines from where the trim adhered to your vehicle.Before washing your car, be sure to remove any wax or protectant that has been previously applied to your rubber or plastic trim. Wax repels water, and you wouldn’t be able to clean the exterior car trim properly if wax is still present on it. Use a mild but effective car wash shampoo that works well on both metal and plastic or rubber so you don’t have to buy two kinds of cleaning products. You can apply a soft brush to remove caked-on mud and dirt on the trim.
Once the trim is completely dry, apply your desired protectant product to keep the plastic or rubber from drying out. If the trim on your car has already faded to a dull color, you can also use a trim restorer to bring back its color and sheen
(from: http://www.detailxperts.net/blog/2013/05/28/auto-detailing-guide-exterior-car-trim/?utm_source=feedburner&utm_medium=feed&utm_campaign=Feed%3A+detailxperts%2Fsgki+%28Detailxperts.net+website+blog%29)
How to Clean, Wax and Detail Your Car: Expert Tips
Cleaning and waxing are the most basic maintenance tasks for a car owner. But doing it right—without hazy paint, dull headlights and crud in the cracks—takes expertise. Make the finish on the exterior and interior last as long as the mechanicals with these pro cleaning tips.
Guess what? The median age of cars on the road is creeping up. But thanks to industry-wide improvements in quality, cars are more reliable than they were only a decade ago. One hundred thousand miles was the watershed number that labeled a car as "old" back in the day. Now, it's not uncommon for a vehicle to last twice that many miles before something too expensive to fix forces it into the scrap yard. That's the good news. Here's the bad news: The paint, body and interior have twice as much time marinating in the elements to lose that factory-fresh patina and start looking like Jed Clampett's pickup. So how does a vehicle's condition affect its market price? We looked up the trade-in value of a 2000 Honda Accord with 100,000 miles at edmunds.com. The site says that in excellent condition, it's worth just about five grand in trade. Downgrade that rating to average and you'll lose over $2000. Here's how to protect your investment--and maximize its value down the road.
The same goes for your car's interior. That slimy patina of French fries, Big Gulp, sweat and dirt will eventually turn your interior into a primordial swamp. Shampoo the cloth seats to remove all that gunk. Now, forget what you think you know. There's nothing under your kitchen sink that's appropriate for washing or cleaning your car, except maybe the glass cleaner. Leave the dish detergent for the dishes, and use a proper car-washing solution. Clean the window glass last to catch all the oversprayed cleaning products.
Leather seats deserve a proper leather cleaner, followed by leather conditioner to replenish the skin's natural oils. Save the protectant for the dashboard. I strongly recommend against using protectant on the steering wheel and rubber pedals, because it can reduce your grip to dangerous levels.
Park in the shade while washing and waxing to prevent the heat of the sun from drying off the car and making water spots before you can dry them. Wet the surface beforehand to help dissolve the bug stains and loosen the dirt. Hose the salt and mud off the wheel wells and undercarriage.
Clean the wheels first to keep all the slop from getting on the bodywork. Rinse the wheels down, but wax them with the rest of the paint. Now you can wash the car all over with a lambswool wash mitt, drying it with chamois, terrycloth or microfiber towels. Save the diapers--they're too abrasive.
The gold standard in wax used to be hard-to-apply paste carnauba wax. You know: Wax on, wax off. Modern chemistry has reduced wax to nano-size particles, added synthetics and generally made wax easy to apply and remove. We also like quick detailers for everyday use. Follow up a quick wash and dry with a light spray of detailer and wipe down with a microfiber towel for months of protection from the environment. Final step: Clean up any water spots on the windows inside and out.

Neglected paint can haze out and collect surface contaminants that chemical-cleaner waxes can't improve. Try a clay bar, an old detailer's trick. Start with a thorough wash to remove abrasive dirt. Then spray the clay kit's lubricant over a few square feet of panel. Knead the clay bar to soften it, and run it over the surface in straight lines. Flip the bar over and rub at right angles. Keep the surface wet. It should take a good hour to clay a typical car. Follow up with a wash and wax.


Hazed-out plastic headlights are not only ugly, they're dangerous. We're using a Mothers PowerBall and plastic polish to make our old lights look new. Mask the area to keep from polishing off the surrounding paint.

Wet down the wheel and tire, then spray or brush on the wheel cleaner. Use a soft brush to get in where the brake dust hides, then hose down. Lather, rinse, repeat--then dry the water spots off with a clean towel. Follow up with car wax.

Much of what you think is polished metal on today's cars is actually either chromed plastic or painted and clear-coated metal. Lightly polish an inconspicuous area for a few seconds. Bare metal will leave dark gray residue in the polishing cloth--no gray means you're polishing clear coat. That's bad. Hand-polishing works fine, but we saved a lot of time on some aluminum wheels using a PowerCone on a cordless drill. Follow up with, you guessed it, wax.

An old toothbrush or a specialized detailing brush will get crud out of cracks. Be sure the vehicle is dry before waxing.

I owned a black car--once. And it's a commitment to keep it looking primo. Turtle Wax's Black Box has special cleaners and, no kidding, black wax that won't leave white residue in every crack.

Hazed-out paint will usually recover if you use a good chemical-cleaner wax. If your car has clear-coat paint--most cars made since the '90s do--look for a product labeled "clear-coat safe." Abrasive compounds are great for non-clear-coat paints on older cars.
Use the same trick I described for metal polish to check if your paint is clear-coated. Rub a hidden area of the paint surface with compound. If the rag picks up any body color, there's no clear coat.

Grayed-out plastic trim can make your ride look old before its time. Protectants will help, but won't last out in the sun. We used Mothers Back-to-Black cream to restore this car's trim. Forget about using black shoe polish. Don't ask how I know this.
Guess what? The median age of cars on the road is creeping up. But thanks to industry-wide improvements in quality, cars are more reliable than they were only a decade ago. One hundred thousand miles was the watershed number that labeled a car as "old" back in the day. Now, it's not uncommon for a vehicle to last twice that many miles before something too expensive to fix forces it into the scrap yard. That's the good news. Here's the bad news: The paint, body and interior have twice as much time marinating in the elements to lose that factory-fresh patina and start looking like Jed Clampett's pickup. So how does a vehicle's condition affect its market price? We looked up the trade-in value of a 2000 Honda Accord with 100,000 miles at edmunds.com. The site says that in excellent condition, it's worth just about five grand in trade. Downgrade that rating to average and you'll lose over $2000. Here's how to protect your investment--and maximize its value down the road.
Scrub Down
Cars get dirty. But there's more than just dirt and rain spots clinging to your car's exterior. Airborne industrial pollutants, acid rain, dead bugs, tree sap and bird droppings can all degrade the paint. Modern car finishes are all covered with a clear coat to protect the pigmented main layer, but even this UV-resistant outer layer will last longer if you maintain it. Keep things clean and waxed to repel water and pollutants.The same goes for your car's interior. That slimy patina of French fries, Big Gulp, sweat and dirt will eventually turn your interior into a primordial swamp. Shampoo the cloth seats to remove all that gunk. Now, forget what you think you know. There's nothing under your kitchen sink that's appropriate for washing or cleaning your car, except maybe the glass cleaner. Leave the dish detergent for the dishes, and use a proper car-washing solution. Clean the window glass last to catch all the oversprayed cleaning products.
Leather seats deserve a proper leather cleaner, followed by leather conditioner to replenish the skin's natural oils. Save the protectant for the dashboard. I strongly recommend against using protectant on the steering wheel and rubber pedals, because it can reduce your grip to dangerous levels.
Park in the shade while washing and waxing to prevent the heat of the sun from drying off the car and making water spots before you can dry them. Wet the surface beforehand to help dissolve the bug stains and loosen the dirt. Hose the salt and mud off the wheel wells and undercarriage.
Clean the wheels first to keep all the slop from getting on the bodywork. Rinse the wheels down, but wax them with the rest of the paint. Now you can wash the car all over with a lambswool wash mitt, drying it with chamois, terrycloth or microfiber towels. Save the diapers--they're too abrasive.
The gold standard in wax used to be hard-to-apply paste carnauba wax. You know: Wax on, wax off. Modern chemistry has reduced wax to nano-size particles, added synthetics and generally made wax easy to apply and remove. We also like quick detailers for everyday use. Follow up a quick wash and dry with a light spray of detailer and wipe down with a microfiber towel for months of protection from the environment. Final step: Clean up any water spots on the windows inside and out.
Expert Tip: Take Out the Haze with Clay
Neglected paint can haze out and collect surface contaminants that chemical-cleaner waxes can't improve. Try a clay bar, an old detailer's trick. Start with a thorough wash to remove abrasive dirt. Then spray the clay kit's lubricant over a few square feet of panel. Knead the clay bar to soften it, and run it over the surface in straight lines. Flip the bar over and rub at right angles. Keep the surface wet. It should take a good hour to clay a typical car. Follow up with a wash and wax.
Exterior Care
Hazed-out plastic headlights are not only ugly, they're dangerous. We're using a Mothers PowerBall and plastic polish to make our old lights look new. Mask the area to keep from polishing off the surrounding paint.
Wet down the wheel and tire, then spray or brush on the wheel cleaner. Use a soft brush to get in where the brake dust hides, then hose down. Lather, rinse, repeat--then dry the water spots off with a clean towel. Follow up with car wax.
Much of what you think is polished metal on today's cars is actually either chromed plastic or painted and clear-coated metal. Lightly polish an inconspicuous area for a few seconds. Bare metal will leave dark gray residue in the polishing cloth--no gray means you're polishing clear coat. That's bad. Hand-polishing works fine, but we saved a lot of time on some aluminum wheels using a PowerCone on a cordless drill. Follow up with, you guessed it, wax.
An old toothbrush or a specialized detailing brush will get crud out of cracks. Be sure the vehicle is dry before waxing.
I owned a black car--once. And it's a commitment to keep it looking primo. Turtle Wax's Black Box has special cleaners and, no kidding, black wax that won't leave white residue in every crack.
Hazed-out paint will usually recover if you use a good chemical-cleaner wax. If your car has clear-coat paint--most cars made since the '90s do--look for a product labeled "clear-coat safe." Abrasive compounds are great for non-clear-coat paints on older cars.
Use the same trick I described for metal polish to check if your paint is clear-coated. Rub a hidden area of the paint surface with compound. If the rag picks up any body color, there's no clear coat.
Grayed-out plastic trim can make your ride look old before its time. Protectants will help, but won't last out in the sun. We used Mothers Back-to-Black cream to restore this car's trim. Forget about using black shoe polish. Don't ask how I know this.
Friday, May 24, 2013
How To Detail Clay Your Car - Detailing 101
Every car finish shares a common enemy. This enemy, usually invisible, is relentless in its pursuit; it surrounds us in the air we breathe and your vehicle's paint is engaged in battle with it from the time it rolls out of the factory gate. The enemy is airborne pollution and fall out. Regular washing cannot remove it and even paint polishing is highly inefficient at attacking it. The solution is Detailing Clay.
Detailing Clay is perhaps one of the most innovative and effective do-it-yourself product developments in the car care industry, despite being overlooked by many detailers and enthusiasts. Invented in Japan in the late 1980s, automotive Detailing Clay is a paint cleaning system designed to safely and effectively remove bonded surface contamination that is not removed with normal car washing.
Claying your paint with Detailing Clay is not a substitute for polishing your car. Claying is a process that needs to be done prior to polishing to remove contaminants that have adhered to your paint. The polishing process then removes paint defects such as scratches, swirl marks, oxidation, and staining while improving overall paint clarity to enhance gloss and prepare your paint to accept car waxes, paint sealants, or coatings.
For those who have never done it, rubbing detailing clay on your car does sound a little strange, but it is actually very effective, super easy, quick, and extremely safe! If you have never clayed your paint you will quickly see what you have been missing within the first few passes. It's actually kind of fun!
This step-by-step article will walk you through the process of claying to remove the bonded surface contamination and prepare your car for polishing and/or protection.
Does My Car Need to be Clayed?
Do you feel the difference? The plastic bag basically amplifies the surface contamination bonded to your car. Even if you don’t feel much, it is best to remove it before moving on to your polishing and protecting processes.
Types of Bonded Surface Contamination
Bonded surface contaminants make your paint feel rough leaving your paint more prone to oxidation and premature aging. If your paint is not slick and smooth, dirt and grime tend to stick to the surface of your car, which can lead to instilling that dreaded swirl during your car wash process.
How Detailing Clay Works
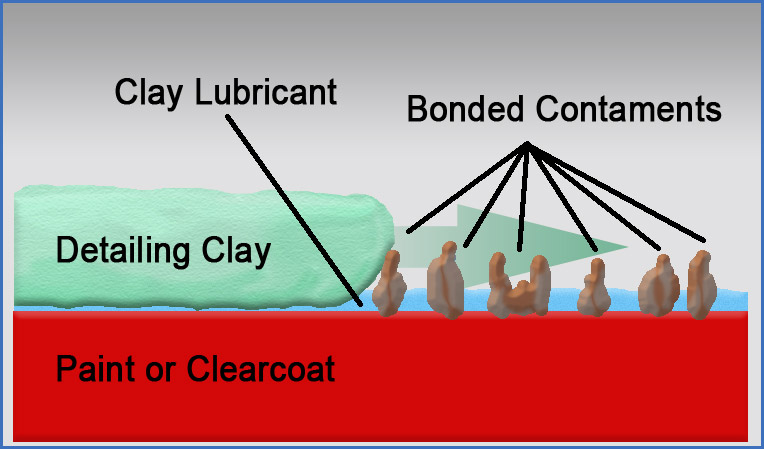 Surface contamination, as shown by this magnified illustration, won’t budge when you wash the surface using a traditional wash method. The contamination is even difficult to polish off. Detailing Clay will quickly and easily remove this contamination as it glides across your paint surface without damaging your paint.
Detailing Clay works by gliding over the surface of your paint on a thin layer of clay lubricant. The contamination sticks up through the surface of the paint where the clay is able to remove it. The clay lubricant helps to keep the clay from sticking to the surface of the paint while it removes the bonded contamination. Although detailing clay is abrasive, it will not harm paint as it is only abrasive to the contamination. The Detailing Clay actually shears the bonded surface contamination without harming your paint.
Types of Detailing Clay
There are many brands of clay with different levels of aggressiveness. Aggressive Detailing Clays are typically used in body shops to remove difficult contaminants like heavy paint overspray. Ultra-fine to medium grade Detailing Clays are formulated for professional detailers, serious enthusiasts and average consumers.
Meguiar's Professional Detailing Clay is an aggressive detailing clay that will quickly cut through heavy contamination. However the abrasives in this synthetic bar are aggressive enough to lightly mark or scratch the paint, requiring some machine paint polishing to remove. This bar is recommended for professionals or serious enthusiasts who have machine paint polishing experience.
BLACKFIRE PolyClay II is a medium grade of synthetic clay that is gentle to paint but tough on paint contamination. This is a consumer grade clay that many professionals use for its quick cleaning action.
Sonus SFX Ultra-Fine Detailing Clay is an extremely fine clay that will remove light contamination quickly with almost no risk of damaging even the softest paints. This fine clay is well suited for regular use and is so gentle that it will not remove most waxes and paint sealants.
The Ultima Elastrofoam Paint Cleaning System is a new take on the clay bar. With the Ultima System the clay bar is replaced by a specially lined Elastrofoam foam block. The special lining on the block allows it to remove contamination just like a clay bar, yet it can be rinsed and re-used many times.
Clay Lubrication
Without proper lubrication Detailing Clay simply will not work. Instead, the clay will stick or skip across the paint and likely cause marring. Lubrication with a detail spray or proper clay lubricant, like BLACKFIRE Clay Lubricant, Sonus Glyde Clay Lubricant, or Meguiar's M34 Final Inspection will help the Detailing Clay to properly glide across the paint surface.
Detailing Clay Procedure
IMPORTANT! If you drop your detail clay bar on the ground you MUST throw it away as it will pick up dirt from the ground that will scratch your car!
IMPORTANT! Keep your clay and the surface well lubricated with your detailing clay lubricant.
Increase the Life of Your Clay Bar
As your Detailing Clay Bar works by lightly abrading and removing contamination, it becomes contaminated itself and a fine gray or brown film will begin to cover the surface of the clay. Traditionally, the contaminated side is folded onto itself to expose a clean side. While this works well and you can get considerable life from your Detailing Clay, the question remains: what just happened to the contamination that was pressed into the center of the clay?
Over time, the contamination will become so heavy that the clay bar will lose its ability to work and can cause scratching. BLACKFIRE Clay Cleaner & Extender is a formula designed to clean the contamination from the surface of the clay without drying it out or damaging it. Mist a couple of squirts of this cleaner on the contaminated side, massage into the clay with your thumbs, and rinse off; the contamination will rinse away. Now you can fold clean clay onto itself and prevent one of the main causes of clay losing its effectiveness.
Storage: Be sure to spritz your detail clay bar with your clay lubricant to keep it from sticking. Store it in its original box or in a re-sealable plastic bag. Do not let your detail clay freeze or reach temperatures above 120 degrees.
Detailing Clay is perhaps one of the most innovative and effective do-it-yourself product developments in the car care industry, despite being overlooked by many detailers and enthusiasts. Invented in Japan in the late 1980s, automotive Detailing Clay is a paint cleaning system designed to safely and effectively remove bonded surface contamination that is not removed with normal car washing.
Claying your paint with Detailing Clay is not a substitute for polishing your car. Claying is a process that needs to be done prior to polishing to remove contaminants that have adhered to your paint. The polishing process then removes paint defects such as scratches, swirl marks, oxidation, and staining while improving overall paint clarity to enhance gloss and prepare your paint to accept car waxes, paint sealants, or coatings.
For those who have never done it, rubbing detailing clay on your car does sound a little strange, but it is actually very effective, super easy, quick, and extremely safe! If you have never clayed your paint you will quickly see what you have been missing within the first few passes. It's actually kind of fun!
This step-by-step article will walk you through the process of claying to remove the bonded surface contamination and prepare your car for polishing and/or protection.
Does My Car Need to be Clayed?
First of all, age does not matter! Many people think that a new car does not need to be clayed. This is not necessarily true. Contamination doesn’t care if your car is new or old. If your car is subjected to airborne contamination that has bonded to the surface it needs to be clayed.
Just remember, even a new car has been subjected to several environments prior to the salesman handing you the keys. Your car started at the factory, sat on a lot waiting for transport via ship, train or truck, and then it sat on the lot waiting to be purchased. Who knows what was floating around the air on the long journey between the factory and your driveway?
Surface Contamination Test
 New or old, there is a way to tell if it is time to clay your car. The contamination that clay removes can often be felt by touch. Paint should feel smooth. If you feel a gritty, a sandy, or a pebble like texture on the paint then it needs to be clayed.
Just remember, even a new car has been subjected to several environments prior to the salesman handing you the keys. Your car started at the factory, sat on a lot waiting for transport via ship, train or truck, and then it sat on the lot waiting to be purchased. Who knows what was floating around the air on the long journey between the factory and your driveway?
Surface Contamination Test
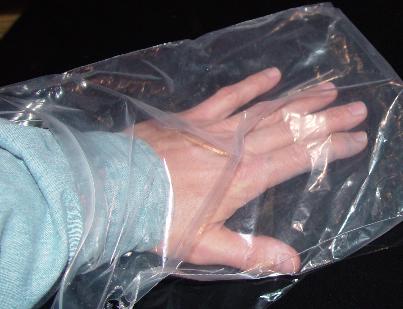
New or old, there is a way to tell if it is time to clay your car. The contamination that clay removes can often be felt by touch. Paint should feel smooth. If you feel a gritty, a sandy, or a pebble like texture on the paint then it needs to be clayed.- Wash your car to make sure the surface is clean and free of any loose dirt, then feel the surface with the back of your hand for obvious contamination. Sometimes you can feel it right away but you may need to go one step further with your contamination test.
- Take a plastic baggie and place your hand inside the bag.
- Run the bag over the same area of your paint that you felt with your bare hand
Do you feel the difference? The plastic bag basically amplifies the surface contamination bonded to your car. Even if you don’t feel much, it is best to remove it before moving on to your polishing and protecting processes.
Types of Bonded Surface Contamination
Bonded surface contaminants make your paint feel rough leaving your paint more prone to oxidation and premature aging. If your paint is not slick and smooth, dirt and grime tend to stick to the surface of your car, which can lead to instilling that dreaded swirl during your car wash process.
- Paint Overspray
- Rail Dust
- Industrial Pollution
- Road Grime
- Brake Dust
- Bugs Remains
- Pollen
- Specs from Tree Sap or Tar
- Many other contaminants that float around the air and attach themselves to your paint’s surface.
How Detailing Clay Works
Surface contamination, as shown by this magnified illustration, won’t budge when you wash the surface using a traditional wash method. The contamination is even difficult to polish off. Detailing Clay will quickly and easily remove this contamination as it glides across your paint surface without damaging your paint.Detailing Clay works by gliding over the surface of your paint on a thin layer of clay lubricant. The contamination sticks up through the surface of the paint where the clay is able to remove it. The clay lubricant helps to keep the clay from sticking to the surface of the paint while it removes the bonded contamination. Although detailing clay is abrasive, it will not harm paint as it is only abrasive to the contamination. The Detailing Clay actually shears the bonded surface contamination without harming your paint.
Types of Detailing Clay
There are many brands of clay with different levels of aggressiveness. Aggressive Detailing Clays are typically used in body shops to remove difficult contaminants like heavy paint overspray. Ultra-fine to medium grade Detailing Clays are formulated for professional detailers, serious enthusiasts and average consumers.
Meguiar's Professional Detailing Clay is an aggressive detailing clay that will quickly cut through heavy contamination. However the abrasives in this synthetic bar are aggressive enough to lightly mark or scratch the paint, requiring some machine paint polishing to remove. This bar is recommended for professionals or serious enthusiasts who have machine paint polishing experience.
BLACKFIRE PolyClay II is a medium grade of synthetic clay that is gentle to paint but tough on paint contamination. This is a consumer grade clay that many professionals use for its quick cleaning action.
Sonus SFX Ultra-Fine Detailing Clay is an extremely fine clay that will remove light contamination quickly with almost no risk of damaging even the softest paints. This fine clay is well suited for regular use and is so gentle that it will not remove most waxes and paint sealants.
The Ultima Elastrofoam Paint Cleaning System is a new take on the clay bar. With the Ultima System the clay bar is replaced by a specially lined Elastrofoam foam block. The special lining on the block allows it to remove contamination just like a clay bar, yet it can be rinsed and re-used many times.
Clay Lubrication
Without proper lubrication Detailing Clay simply will not work. Instead, the clay will stick or skip across the paint and likely cause marring. Lubrication with a detail spray or proper clay lubricant, like BLACKFIRE Clay Lubricant, Sonus Glyde Clay Lubricant, or Meguiar's M34 Final Inspection will help the Detailing Clay to properly glide across the paint surface.
Detailing Clay Procedure
IMPORTANT! If you drop your detail clay bar on the ground you MUST throw it away as it will pick up dirt from the ground that will scratch your car!
- Always work in a shaded area and on a cool surface. Claying your car on a warm or hot surface will tend to make the clay stick to the surface and will not be effective to remove the bonded surface contamination.
- Thoroughly wash and dry your car or truck.
- Cut your Detailing Clay in half or quarters and form a round flat wafer. A 200g Detailing Clay Bar will make four pieces.
- Spray your detail clay lubricant onto about a 2’ by 2’ area.
- Gently with slight pressure glide the detailing clay bar over the surface of the paint in a back and forth motion. Do not apply excessive pressure; remember you are only hydroplaning over the surface to remove bonded contaminants. The clay may tend to grab at first, then you will feel it break free and easily glide as the contaminants are removed.
IMPORTANT! Keep your clay and the surface well lubricated with your detailing clay lubricant.
- Wipe clay lubricant from the surface with a quality microfiber towel such as a 530 Supreme.
- Fold over your clay and knead to reshape often to expose a clean clay surface.
- Feel the area that has been cleaned. It should feel slick and smooth. If not, you will need to repeat the process until all of the surface contamination has been removed.
- Continue this process over the entire car. Remember that detail clay works great on glass, chrome and wheels too. Heavy embedded contaminants on wheels will probably require lots of elbow grease!
As a precaution when claying wheels be sure to use a dedicated clay bar that will not ever be used on your car’s paint.
Increase the Life of Your Clay Bar
As your Detailing Clay Bar works by lightly abrading and removing contamination, it becomes contaminated itself and a fine gray or brown film will begin to cover the surface of the clay. Traditionally, the contaminated side is folded onto itself to expose a clean side. While this works well and you can get considerable life from your Detailing Clay, the question remains: what just happened to the contamination that was pressed into the center of the clay?
Over time, the contamination will become so heavy that the clay bar will lose its ability to work and can cause scratching. BLACKFIRE Clay Cleaner & Extender is a formula designed to clean the contamination from the surface of the clay without drying it out or damaging it. Mist a couple of squirts of this cleaner on the contaminated side, massage into the clay with your thumbs, and rinse off; the contamination will rinse away. Now you can fold clean clay onto itself and prevent one of the main causes of clay losing its effectiveness.
Storage: Be sure to spritz your detail clay bar with your clay lubricant to keep it from sticking. Store it in its original box or in a re-sealable plastic bag. Do not let your detail clay freeze or reach temperatures above 120 degrees.
Subscribe to:
Posts (Atom)